We can clarify your doubts about OBIEE in the "Ask Questions..." Page by explaining your issue.....

Tuesday, 26 March 2013

How to Apply Patches Using Opatch utility in OBIEE 11g

Step:1  Ensure you have the latest Opatch:

Make sure you have the latest supported version of OPatch downloaded.

You can download the latest Opatch and install it in the directory on your machine under:
D:\Oracle\Middleware\Oracle_BI1\OPatch

Step 2 : Download the patch to PATCH_TOP

Download the patch to PATCH_TOP directory, as instructed in the README

Step: 3
 cd to patch (for example 10042883) directory:
D:\PATCH_TOP>cd 10042883

Step 4 : Make sure Opatch is in the PATH
Add D:\OPatch to the PATH:
D:\PATCH_TOP\10042883>set PATH=%PATH%;D:\Oracle\Middleware\Oracle_BI1\OPatch

Verify that the PATH is set:
D:\PATCH_TOP\10042883> PATH

Step 5 : Set ORACLE_HOME

Set ORACLE_HOME to your BI Home.
For example, in this case,  BI Home is set to D:\Oracle\Middleware\Oracle_BI1
D:\PATCH_TOP\10042883>set ORACLE_HOME=D:\BI11\Oracle_BI1

Verify that the Oracle Home is set correctly:
D:\PATCH_TOP\10042883>echo %ORACLE_HOME%


Note: You are setting ORACLE_HOME for this command-prompt session only. This is set to only facilitate patch application/rollback/inventory, etc. Do not make this a permanent environment variable as it will affect other Oracle Products running on your system which may need a permanent ORACLE_HOME environment variable.

Step 6 : Verify Opatch version

Verify you have the correct OPatch version:
D:\PATCH_TOP\10042883>opatch version

Invoking OPatch 11.1.0.8.3
OPatch Version: 11.1.0.8.3
OPatch succeeded.

Step 7 : Apply the OBIEE patch (for example 10042883)
7.1: Shutdown all BI services:
Apply patch 10042883 -- Before applying any OBIEE patch, make sure all
BI Services are shut down.
Start->Programs->Oracle BI->Stop BI Services
7.2: Apply the patch:
D:\PATCH_TOP\10042883>opatch apply

If you are running a 64-bit OS: Windows64bit / Linux 64bit / AIX 64bit, make sure
you use the following command:
opatch apply -jre %ORACLE_HOME%/jdk/jre
OPatch succeeded.
Step 8 : lsinventory command
Verify that the patch was applied correctly by checking the inventory:
D:\PATCH_TOP\10042883>opatch lsinventory
If you are running a 64-bit OS: Windows64bit / Linux 64bit / AIX 64bit, make sure
you use the following command:
opatch lsinventory -jre %ORACLE_HOME%/jdk/jre

For more info refer below Oracle Doc:


Thanks,
Allam

Evaluate() Function in OBIEE to Embedded DB Functions

This Evaluate functions (since version 10.1.3.3) enables users and administrators to create more powerful reports by directly calling Database functions in OBIEE from:


  1. Either By Oracle BI Answers.
  2. OR by using a Logical column (in the Logical Table source) within the Metadata (repository).
The following new BI Server database functions are supported

Functions For

1. EVALUATE( ) --> It is a scalar function that are computed post-aggregation and analytic calculations

2. EVALUATE_AGGR ( ) --> It is a aggregate function with group by clause

EVALUATE( ) Function :


Syntax:
EVALUATE('db_function(%1...%N)' [AS datatype] [, column1, columnN])

Example:

1. Evaluate('TO_DATE(%1,%2)' AS CHAR ,'20130326','YYYYMMDD')

2. Evaluate('substr(%1,%2,%3)' as Char,'AllamNarasingaRao','1','5')

Passes the specified database function with (optional) referenced columns as parameters to the back-end data source for evaluation. This function is intended for scalar and analytic calculations, and is useful when you want to use a specialized database function that is not supported by the Oracle BI Server, but that is understood by the underlying datasource.

The embedded database function may require one or more columns. These columns are referenced by %1 ... %N within the function. The actual columns must be listed after the function.

EVALUATE_AGGR( ) Function:
Syntax:

EVALUATE_AGGR('db_agg_function(%1...%N)' [AS datatype] [, column1, columnN])
  Example:
EVALUATE_AGGR('sum(%1)', "sales"."quantity")
Passes the specified database function with (optional) referenced columns as parameters to the back-end data source for evaluation. This function is intended for aggregate functions with a GROUP BY clause.
The embedded database function may require one or more columns. These columns are referenced by %1 ... %N within the function. The actual columns must be listed after the function.

Let see How can use the Evaluate Function properly.

Need Click on the Edit column Formula>f(...) to select the Evaluate( ) Function.

In Insert Option Dialog prompt need to select the DB Functions to specify the Evaluate Function.
 
After select the Evaluate Function in the Prompt dialogbox, the syntax of the Evaluate function will see like the above in screen shot.
 
There we need to replace the inner things with our valid syntax formate. As specified Below
 
 
Here
 
Evaluate('substr(%1,%2,%3)' AS Char,'AllamNarasingaRao','1','5')

  • Evauate ( ) is the function we know about it.
  • Substr ( ) is the DB Function. It needs to enclosed in the single quotes, like this 'substr( )'
  • AS Char is the Datatype, We need to specify this also after enclosed your DB function. Then after we need to place the , .
  • 'AllamNarasingaRao','1','5'
In our example the above 3 strings are the perameters, those we need to pass into the Evaluate Function by specifying the %1 for first string ('AllamNarasingaRao'), %2 for Second String ('1') and %3 is for Third String ('5').


Lets run this by clicking on the Results Tab. And See what will happen.


In this case we will get one common error in Evaluate Function that is

[nQSError: 42015] Cannot function ship the following expression:Evaluate( substr(%1,%2,%3),'AllamNarasingaRao', '1', '5') . (HY000)


This Error is came beacouse of taking the only one column that too it has Evaluate function. In this case we can resolve this error by taking at least one more column from exisiting subject area.    
    Like the following above steps we can resolve that type of errors comming while using the Evaluate function.   Note: We need to add at least one more column to the exsisting Evaluate function column.  
  • Here I am specifying some examples with Evaluate function used in the OBIEE 11g.
1. Evaluate('TO_CHAR(%1 ,%2)' AS CHAR ,"Itemwarehouse"."Last Update Date",'DD-MON-YYYY')

2. Evaluate('NEXT_DAY(%1,%2)' ,"Itemwarehouse"."Last Update Date",'SUNDAY')

3. Evaluate('TO_DATE(%1,%2)' AS CHAR ,'20130326','YYYYMMDD')

4. Evaluate('TO_CHAR(TO_DATE(%1,%2),%3)'AS CHAR ,'20130326','YYYYMMDD','DD-MON-YYYY')

5. Evaluate('TO_CHAR(TO_DATE(%1,%2),%3)'AS CHAR ,"Itemwarehouse"."Last Update Date",'DD/MM/YY HH:MI:SS AM','DD-MON-YYYY HH:MI:SS AM')    

---The End---

Monday, 11 February 2013

OBIEE 11g installation on Windows XP


Just finished my OBIEE 11g successful installation on Windows XP Professional – SP3 with 2GB Memory and 50 GB available disk space. 

I have my local Oracle instance is running on the same machine as well. Before writing this article, I tested couple of demo reports and yes they are working, So If you are looking for the simple and clean installation steps, here you go ….

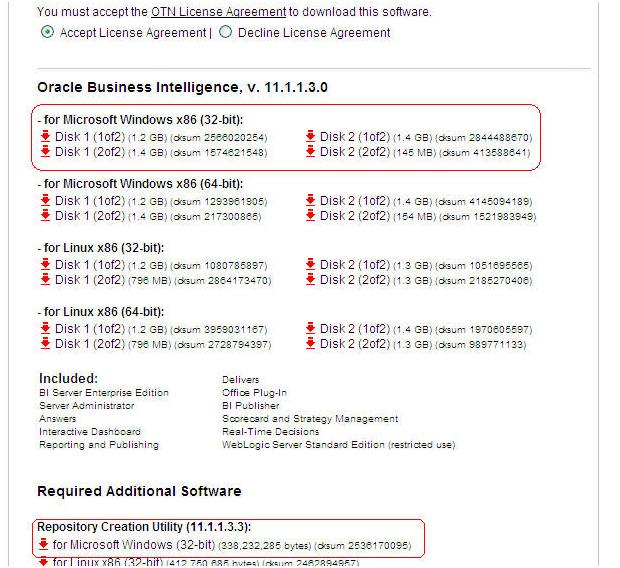
1) The first step is to download software.
Yes it is around 5 GB; you have to have high speed uninterrupted connection. Otherwise you end up with couple of hours in waiting to complete the download. 
Please follow following links to download OBIEE11g and RCU (Repository Creation Utility).

Accept the license and download all the four files belongs to”Oracle Business Intelligence, v. 11.1.1.3.0 (for Microsoft Windows x86 (32-bit)" and one file for”Repository Creation Utility (11.1.1.3.3) for Microsoft Windows (32-bit)"


2) If your system uses the dhcp to access network, make sure to install Look Back Adopter. Please refer following URL for installation details.How to install the Microsoft Loopback adapter in Windows XP
3) make sure you have enough disk space. Software needs 11 GB of free disk space,
4) Unzip the RCU zip file into some directory and run the rcu.bat under BIN directory. Make sure your database is up before running the RCU; this will install the BI and Metadata schema.
Click next...

Select Create option and click next…

Provide the Database connection details. Use the user, which has SYSDBA privilege. Better use the sys or system user to avoid any confusion. This user will be used to create the schema.

Oops!!, Warning !! . My Oracle database version is 10.2.0.2.0, while it is required minimum 10.2.0.4. Any way I clicked the ignore, so you can do the same or get the right version...
You can select an existing prefix or select the next prefix.
Check the Oracle Business Intelligence. Please note down the schema name. You will need it during OBIEE installation. It is DEV1_BIPLATFORM in this case. Metadata Services is already checked for you
Click Next.
 

The second part is OBIEE installation
Unzip all 4 zip files in one folder and open the Disk1 folder and run the setup.exe
Click next on welcome page...


Select the simple installation for demo purpose. Click Next
It will check the Prerequisite,
On Next step, specify the location, where you want to install the software. Make sure it has around 11gb free disk space.
Select the username, password for weblogic server, the same userid, and password will be use to access the OBIEE.
Click Next…
On Configuration component, select the component. I installed all three components.

 
On Database details screen, enter the Database details where we have installed the BI schema through RCU.  Our Database Schema was DEV1_BIPLATFORM, though, you see DEV1_BIPLATFORM in the above screen shot. Please do not get confuse, and enter the correct Schema as DEV1_BIPLATFORM and the password.
Skip the next screen security Updates and click Next...


Review the installation summary on following screen and click install...
After clicking the Install button, Installation process will start. The process will take some time, so have patient. In the middle of the process you will see a blank command window...
The installation proves will take around 20 minutes. It could be more or less depend on the available resources.
The next step is Configuration Progress, this will automatically start after completion of installation and it took around 30 minutes for me.

Finally the configuration 100% completed. Click the next button.
We can access the Enterprise Manager to administrator Web logic Server  through  http://localhost:7001/em and analytics as http://localhost:9704/analytics URL.
Let’s see if we can access the most awaited webpage.  If everything goes smooth during installation, you can access the presentation services through  http://localhost:9704/analytics URL.  Enter the use rid and password, the one we set during Weblogic server installation.
Here is the Home page...
Let's test one simple report to make sure, everything works fine.
Go to open tab and click it, it will open the Open popup window. Select the Revenue Budget Actual and Detail.xdo, this is a  BI Publisher Report from Sample Lite  folder.

If everything is fine, the report should render within the Report viewer
 If you could able to make up to this point, you have installed your OBIEE11g successfully.
Congratulation…!!!.